记于:2024-03-05 晚上
地点:浙江省·温州市·家里
天气:多云
背景
微信官方提供的navigation-bar组件集成后布局有些错位,一直调整不好,索性自定义一个。
目标
布局可控、功能可控即可;
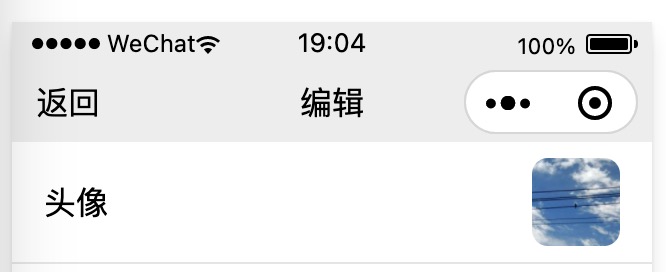
目前主要是需要一个中间的标题和左边的一个返回;
然后布局上适配微信小程序的胶囊按钮;
如图:
难点与思路
唯一算是难点的地方就是和胶囊按钮的适配,也就是要达到让胶囊按钮在导航栏内垂直方向居中的效果;
参考了下网上的一些方案,思路大同小异,主要是通过系统状态栏和胶囊按钮的布局参数来计算导航栏的高度和位置;
首先在app.js中获取计算所需的信息,然后计算出导航栏参数,最终在使用的页面中根据参数渲染出来。
代码
app.js
1
2
3
4
5
6
7
8
9
10
11
12
13
14
15
16
17
18
19
20
21
22
23
24
25
26
27
28
29
30
31
|
App({
globalData: {
systemInfo: undefined,
menuButton: undefined,
statusBarInfo: {
sysBottom: undefined,
sysHeight: undefined,
appBottom: undefined,
appHeight: undefined
}
},
onLaunch(options) {
console.log('app.onLaunch...{}', JSON.stringify(options))
this.globalData.systemInfo = wx.getSystemInfoSync()
this.globalData.menuButton = wx.getMenuButtonBoundingClientRect()
this.globalData.statusBarInfo.sysHeight = this.globalData.systemInfo.statusBarHeight
this.globalData.statusBarInfo.sysBottom = this.globalData.systemInfo.screenTop + this.globalData.systemInfo.statusBarHeight
this.globalData.statusBarInfo.appHeight = (((this.globalData.menuButton.bottom + this.globalData.menuButton.top) / 2) - this.globalData.systemInfo.statusBarHeight) * 2
this.globalData.statusBarInfo.appBottom = this.globalData.statusBarInfo.sysBottom + this.globalData.statusBarInfo.appHeight
console.log('statusBarInfo...', JSON.stringify(this.globalData.statusBarInfo))
}
})
|
custom-navigation-bar.js
1
2
3
4
5
6
7
8
9
10
11
12
13
14
15
16
17
18
19
20
21
22
23
24
25
26
27
28
29
30
31
32
33
34
35
36
37
38
39
40
41
42
43
44
45
46
47
48
49
50
51
52
53
54
55
56
57
58
59
60
61
62
63
64
65
66
67
68
69
70
71
72
73
74
75
76
77
78
79
80
|
Component({
properties: {
innerText: {
type: String,
value: 'default value',
},
title: {
type: String,
value: undefined
},
back: {
type: Boolean,
value: false
},
backgroundColor: {
type: String,
value: 'none'
}
},
data: {
statusBarInfo: {
sysBottom: undefined,
sysHeight: undefined,
appBottom: undefined,
appHeight: undefined,
title: undefined,
back: false,
backgroundColor: 'none'
}
},
lifetimes: {
attached: function() {
console.log('custom-navigation-bar.lifetimes.attached...')
this.calc()
},
detached: function() {
console.log('custom-navigation-bar.lifetimes.detached...')
},
},
methods: {
calc: function () {
console.log('custom-nav.calc...')
var statusBarInfo = getApp().globalData.statusBarInfo
statusBarInfo.title = this.properties.title
statusBarInfo.back = this.properties.back
statusBarInfo.backgroundColor = this.properties.backgroundColor
this.setData({ statusBarInfo })
console.log('statusBarInfo...', JSON.stringify(this.data.statusBarInfo))
},
onBackTap(e) {
console.log('onBackTap...')
wx.navigateBack()
}
}
})
|
custom-navigation-bar.json
1
2
3
4
| {
"component": true,
"usingComponents": {}
}
|
custom-navigation-bar.wxml
1
2
3
4
5
6
7
8
9
10
11
12
13
14
15
16
17
18
19
20
21
22
|
<view class="status-bar" style="background-color: {{backgroundColor}};">
<view class="system-status-bar" style="height: {{statusBarInfo.sysHeight}}px;"></view>
<view class="app-status-bar" style="height: {{statusBarInfo.appHeight}}px;">
<view class="app-status-bar-left">
<view wx:if="{{statusBarInfo.back}}" class="back" bind:tap="onBackTap">返回</view>
</view>
<view class="app-status-bar-center">
<view class="title">{{statusBarInfo.title}}</view>
</view>
<view class="app-status-bar-right"></view>
</view>
</view>
<slot></slot>
|
custom-navigation-bar.wxss
1
2
3
4
5
6
7
8
9
10
11
12
13
14
15
16
17
18
19
20
21
22
23
24
25
26
|
.app-status-bar {
display: flex;
align-items: center;
}
.app-status-bar-left {
flex: 1;
display: flex;
}
.app-status-bar-center {
flex: 1;
display: flex;
justify-content: center;
}
.app-status-bar-right {
flex: 1;
}
.back {
padding-top: 6px;
padding-bottom: 6px;
padding-left: 8px;
margin-left: 4px;
padding-right: 32px;
}
|
使用示例
1
2
3
4
|
<custom-navigation-bar title="编辑" back="{{true}}"></custom-navigation-bar>
<scroll-view class="content-container" scroll-y="true" enable-flex="true">
</scroll-view>
|
同时需要在使用的页面对应的json配置文件中添加引用
1
2
3
4
5
| {
"usingComponents": {
"custom-navigation-bar": "/components/custom-navigation-bar/custom-navigation-bar"
}
}
|
以及在app.json中添加配置
1
2
3
4
5
| {
"window": {
"navigationStyle": "custom"
}
}
|